
I am a work-from-home Dad. My wife’s job and office have, until recently, been outside our home. Due to the looming Covid-19 “Corona Virus” of 2020, my wife has been sent home to work. She now does so from our kitchen (which used to be my space). She is also using the one computer that we have to share… all day. There is my son’s crazy big, double monitor gaming system. We wouldn’t dare. So, since I was out of found-in-home options, I took to the internet and did some searching. Here’s what I found:
The Raspberry Pi 4 Model B computer.
Here it is…
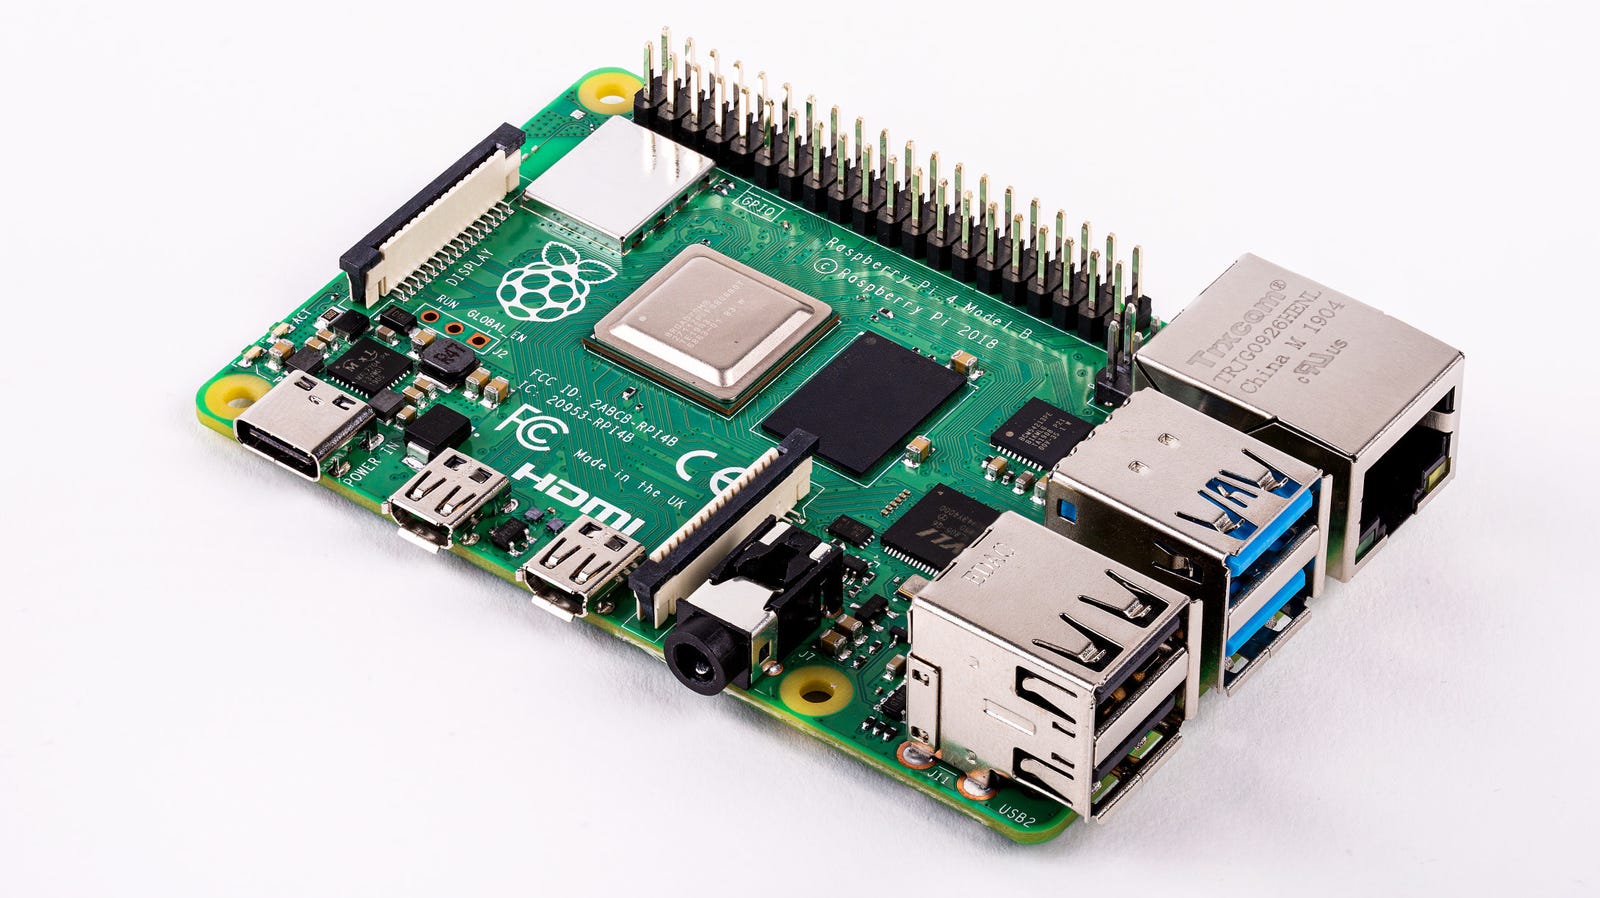
So very small but hugely amazing in its capabilities…
My office PC needs, like most, are very simple: I will need an office suite (maybe) for documentation, taxes, and whatnot. I will need internet access for research, writing, and website maintenance (most of which is done online now anyway). So this, if it can be reasonably fast, will be perfect, at least for the time being.
There may be times, I think when I will need a more robust PC environment for things like video editing. I can’t imagine that 4 gigs of RAM are going to cut it. For this, I will need to be patient and wait for an opening on one of the other PCs in the house.
As described, however, if it all works as I think it will, this would create a more comfortable situation for me and mine for the time being. So, I bought one (as shown above). I also bought a casing to make sure it had a safe home. I mean, you could go without one but, you will be taking an unnecessary risk in my eyes. As well, I had read that the Raspberry Pi 4 Model B can get pretty hot. Not a good thing over time. So I chose a case made from aluminum that came with heat sinks and a fan the Pi will power. It’s a good idea.
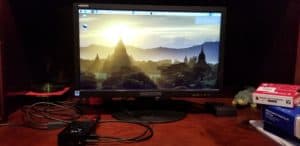
The picture below shows the completed unit.
Please Note: The Raspberry Pi comes almost fully assembled. In my case (sorry for the pun) the case itself was the most difficult aspect. As a whole, it’s not at all complicated to build although, each case will be slightly different in its orientation. The one I used took all of 5 minutes and I had never done it before.
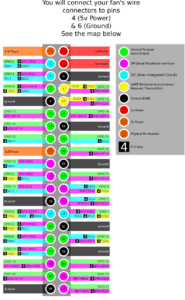
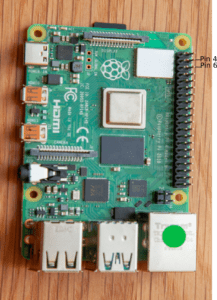
I followed the directions by screwing the fan into place and then connecting the wires, with their pre-installed connectors. I then fastened the Pi to the bottom tray of the case with the proper screws (also included) to the Raspberry Pi board. Lastly, I attached the wire connectors from the fan to the proper “GPIO” (General Purpose Input Output) pins on the Raspberry Pi board. Check your case’s instructions and see the images below for greater detail.
Once the above was all connected, I closed and secured the rest of the case as per the instructions. Afterward, I connected the HDMI cable and the power supply cable; plugged in the keyboard and mouse – a total of mere moments and…
Raspberry Pi 4 Model B with Case Kit with USB-C Power Adapter Ready to Go!!
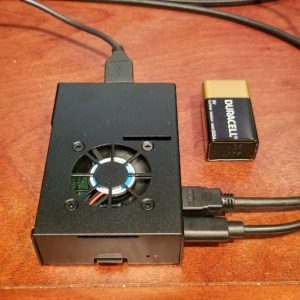
Please Note: The battery shown in this picture is in not used by the tiny Raspberry Pi PC. Its presence here is just meant to give you some sense of scale. It is truly just this big and it does everything that an office PC will ever need to do.
Here’s what I paid:
I found mine at Micro Center. It was about $7 cheaper than the Amazon price. Unfortunately, the product was “in-store-only” and Micro Centers cannot be found everywhere. I don’t know if they charge for shipping but I suspect they might. In any case, here is their link to the Micro Center, just the same. I have no affiliation with this company but I love going there. They never miss.
Smraza Acrylic Case for Raspberry Pi 4 Model B, Case
The case offered here is a little different in its style than the one that I used. This one looks nicer than the one that I opted for and has all the heat sinks, power supply, and fan. It looks great and it’s cheaper than the $19.99 price I paid at Micro Center…
Mini HDMI cable set – I didn’t even know these existed (Note: it would have been cheaper to buy just the one cable but, as it turns out, the Raspberry Pi has two HDMI connections available with which to run 2 screens. Amazing. I wanted to have the other just in case).
This puts my total expenditure at $91.99 (with tax, it all came just short of $100).
How I Was Able to Keep the Overall Cost Down
To start with, I had a working monitor, as described along with a keyboard/mouse from my old office PC set up. I also had a memory card leftover from my old phone (64 Gig).
For whatever reason, I still have every PC I’ve ever owned… not hoarding, necessarily, but I have found that the old gear has come in handy for kids’ school projects and such. I could be wrong, but I think it is probable that most homes would have one or two of these items laying around somewhere. If not, you may be able to go down to your town’s recycling center and find all kinds of great and very usable stuff. Not recycled maybe. Repurposed. For a geek like me, it’s like Christmas down there.
In any case, I list the cost of purchasing these items at the cheapest online prices I was able to find…
Monitor: Sceptre 20″ 75Hz LED Monitor HDMI VGA Build-in Speakers, Brushed Black 2019 (E205W-16003S)
This is a very inexpensive monitor, as monitors go. The one I’m using was less than $80. Once again, you may be able to acquire a used one for free down at the recycling center in your town, depending on their rules (I think my town makes money on these things so they may not be so cooperative. But, it’s worth the shot).
Keyboard and Mouse: Logitech MK270 Wireless Keyboard and Mouse Combo On this there was one other that was cheaper. But, I didn’t recognize the name and it was half the price of this one. That choice is yours, of course. I didn’t trust it so I’m not listing it here.
Memory card: SanDisk Ultra 32GB MicroSDHC UHS-I Card with Adapter – These tend to range in price according to the seller. This was the cheapest I had found on Amazon.com. Also, you don’t have to settle for a 32-gig card. I, myself, am using a 64 on my PC and it cost ~ $5.00 more than the 32 gig card.
To conclude: The Raspberry Pi does a great job as a PC for those who don’t need anything on the higher end of things, ie: gaming, programming, video editing, and other CPU and memory intensive work. If you are just doing common office work and more casual internet browsing, YouTube watching, research, and even things like WordPress website creation, like me (this entire website is being built using the Raspberry Pi 4 Model B), this is the project for you. Not only will you save money and have a new fully functioning office PC that will be way better and cheaper than any Chromebook, but you will also have the pride of having done a good deal of the assembly itself. How cool are you?
It should be mentioned that, unlike most PCs, the Raspberry Pi runs on a Linux operating system. As most of you will be used to having the Microsoft Windows system, there will be some adjusting to endure. When you download software, for instance; an office suite and whatever else you may want, you will be downloading the Linux version of the same. The installations are generally simple and easy just like that of the Microsoft Windows compatible software. Rare as it may be, you will have to install some software from the command line. I know for some that this can sound scary. I can assure you that once you do it for the first time, you will lose any fear you may have had and experience what real control over your computer feels like. You will earn your Geek merit badge and be proud of doing so.
In the end, the Raspberry Pi makes a great PC, it’s cheaper to buy and use than a Chromebook and is way more versatile. Further, if you are into computers and all that they can do, the Raspberry Pi can be used to handle the building of servers, school projects, etc. There are endless possibilities for fun, exploration, and maybe even commerce.
Have fun and best of luck!
Please feel free to leave your “constructive” comments below to let all our fellow readers know what you think and if you can help.
Thanks,
Berk